
Git基础
1、Git简介
(1)什么是Git?
- Git是迄今为止最先进的分布式版本控制系统
(2)Git安装
(3)Git设置
- checking your settings
git config --list # 查看git的所有配置
(4)GitLab和GitHub一起使用
通常公司是使用GitLab,而个人是使用GitHub。那么问题来了:在一台电脑上同时使用GitLab和GitHub应该如何配置?
操作步骤如下:
- 生成公钥、密钥
# GitLab
ssh-keygen -t rsa -C "注册的GitLab邮箱"  # 公钥、密钥名输入gitlab_id_rsa,其他一律回车

# GitHub
ssh-keygen -t rsa -C "注册的GitHub邮箱"  # 公钥、密钥名输入github_id_rsa,其他一律回车
备注:
- 上述代码完成后会在
~/.ssh/目录生成以下文件:github_id_rsa、github_id_rsa.pub、gitlab_id_rsa、gitlab_id_rsa.pub - 将github_id_rsa.pub的内容配置到GitHub网站的sshkey中,将gitlab_id_rsa.pub的内容配置到GitLab网站的sshkey中
- 在
~/.ssh/目录下创建config文件,告诉git不同平台使用不同key
cd ~/.ssh  # cd 到key目录
vi config  # 创建并编辑config
# config内容如下

# gitlab
Host gitlab.yourcompany.com
HostName gitlab.yourcompany.com
User git
Port yourport
PreferredAuthentications publickey
IdentityFile ~/.ssh/gitlab_id_rsa

# github
Host github.com
HostName github.com
PreferredAuthentications publickey
IdentityFile ~/.ssh/github_id_rsa
备注:
- Host是别名,建议与HostName名字一致!
- 把工作用的GitLab的
git config配置成global
cd ~/workspace/gitlab  # gitlab的工作仓库
git init
git config --global user.name 'personal'
git config --global user.email 'personal@company.com'
- 把个人用的GitHub的
git config配置成local
cd ~/workspace/github  # github的工作仓库
git init
git config --local user.name 'yourname'
git config --local user.email 'youremail'
user.eamil建议使用网站提供的加密邮箱,例如GitHub的加密邮箱可以从GitHub网站的个人setting中的Emails栏目中找到。如下:
*@users.noreply.github.com
2、创建版本库
(1)将已有文件夹变为版本库
cd /home/user/my_project  # 切换到想要初始化的文件夹
git init  # 初始化为版本库,文件夹会出现.git的隐藏文件夹
git remote add origin ssh://git@github.com:myhaa/How-To-Ask-Questions-The-Smart-Way.git
git add .  # 添加文件夹中所有文件到暂存区
git commit -m "your commit description"  # 提交暂存区所有文件到版本库并保存提交记录
(2)从远处仓库(GitLab\GitHub)克隆
cd /home/user/my_project  # 切换到想要存放版本库的文件夹
git clone https://github.com/myhaa/How-To-Ask-Questions-The-Smart-Way.git  # clone https地址
git clone ssh://git@github.com:myhaa/How-To-Ask-Questions-The-Smart-Way.git  # clone ssh地址
cd How-To-Ask-Questions-The-Smart-Way  # 进入clone的版本库文件夹
3、操作版本库
(1)版本库中文件的两种状态
- 未追踪状态(untracked):从未add+commit的文件(Untracked files:)
- 追踪状态(tracked):曾经add+commit过的文件
- 未修改(unmodified):在版本库中
- 已修改(modified):Changes not staged for commit:
- 暂存(staged):Changes to be committed:
- 详情如下图(图来自:https://git-scm.com/book/en/v2/Git-Basics-Recording-Changes-to-the-Repository)

(2)Tracking New Files(untracked)
- 查看版本库状态发现README文件是
Untracked file。
$ git status
On branch master
Your branch is up-to-date with 'origin/master'.
Untracked files:
  (use "git add ..." to include in what will be committed)

    README

nothing added to commit but untracked files present (use "git add" to track)
- 将README添加到暂存区并提交到版本库
git add README  # 添加到暂存区(staged)发现README状态为(Changes to be committed: new file)
git commit -m "add README"  # 提交到版本库
(3)Staging Modified Files(tracked)
- 修改刚刚提交到版本库的README文件
vi README  # 用vim修改README文件
git status  # 查看文件状态发现README的状态为(Changes not staged for commit: modified)
- 将README添加到暂存区并提交到版本库
git add README  # 添加到暂存区(staged)
git commit -m "update README"  # 提交到版本库
(4)Viewing Your Staged and Unstaged Changes
- 比较
Changes not staged for commit:下的文件与本地最新版本库的差别:
git diff
- 比较
Changes to be committed:下的文件与本地最新版本库的差别:
git diff --staged
git diff --cached
- 比较
Changes not staged for commit:和Changes to be committed:下同名文件的差别
git diff
(5)配置忽略文件(Ignoring Files)
通常会有一类文件是你不希望Git自动添加或显示为未跟踪的文件,例如日志文件或构建系统生成的文件。 这种情况下可以创建忽略文件
.gitignore来避免。这是一个示例.gitignore文件:
# ignore all .a files
*.a

# but do track lib.a, even though you're ignoring .a files above
!lib.a

# only ignore the TODO file in the current directory, not subdir/TODO
/TODO

# ignore all files in any directory named build
build/

# ignore doc/notes.txt, but not doc/server/arch.txt
doc/*.txt

# ignore all .pdf files in the doc/ directory and any of its subdirectories
doc/**/*.pdf
(6)Removing and Moving files
- short status
git status -s
- skipping the staging area
git commit -a -m 'added new benchmarks'
- removing files
# 第一种情况:手动删除或使用rm命令
rm PROJECTS.md
git add PROJECTS.md
git commit "rm PROJECTS.md"

# 第二种情况:使用git rm命令删除
git rm PROJECTS.md
git commit "git rm PROJECTS.md"

# 第三种情况:删除Changes to be committed:或者Changes not staged for commit:下显示的文件
git rm -f PROJECTS.md
git commit "git rm -f PROJECTS.md"

# 第四种情况:您可能想要做的是将文件保留在工作树中,但将其从暂存区中删除。换句话说,您可能希望将文件保留在硬盘上,但不再需要Git对其进行跟踪。
git rm --cached PROJECTS.md
git commit "git rm --cached PROJECTS.md"
- moving files
git mv file_from file_to  # 重命名file_from为file_to
git commit -m "rename file_from"
(7)查看版本库提交历史
git log  # 查看历史
git log -p -2  # 查看最新2个commit的历史(包含git diff结果)
git log --stat  # 查看提交历史的一些简短统计信息
git log --pretty=oneline  # 每个commit用一行输出
git log --pretty=format:"%h - %an, %ar : %s"  # 按指定格式输出
git log --pretty=format:"%h %s" --graph  # 图形化
git log --since=2.weeks  # 过去2周的提交历史
git log --pretty="%h - %s" --author='Junio C Hamano' --since="2008-10-01" --before="2008-11-01" --no-merges -- t/
- 注意:更多详情请见git log
(8)回退操作(undoing things)
- 当你commit后发现此次commit的message出现错误或者忘记add一些文件时:
git commit --amend # 修改commit信息,ctrl+o保存,回车,ctrl+x退出
- unstaging a staged file(Changes to be committed:)
git reset HEAD CONTRIBUTING.md # 将暂存区的某一个文件退回到工作区
- unmodifying a modified file(Changes not staged for commit:)
git checkout -- CONTRIBUTING.md # 撤销对某文件的修改
- 注意:回退操作异常危险,谨慎使用!!!
(9)远程仓库操作
- showing your remotes
git remote
git remote -v  # 详细信息
git remote show origin  # 详细信息
- 添加远程仓库
git remote add    # 通用代码
git remote add pb https://github.com/paulboone/ticgit  # pb 是给该远程仓库设定的别名
- 从远程获取最新版本到本地但不自动merge
git fetch   # 通用代码
git fetch origin
git fetch pb
- 从远程获取最新版本到本地并自动merge
git pull   # 通用代码
git pull origin
git pull pb
- 将本地库推送远程仓库
git push    # 通用代码
git push origin master
- 将远程仓库重命名
git remote rename pb paul # 将pb重命名为paul
- 移除某个远程仓库
git remote remove paul # 移除paul这个远程仓库
(10)标签操作
- 列出所有标签
git tag
git tag -l "v1.8.5*"  # 列出浅醉是v1.8.5的标签
- 创建带注释的标签(Annotated Tags)
git tag -a v1.4 -m "my version 1.4"
git show v1.4  # 显示这个标签对应的commit
- 创建轻量级标签(Lightweight Tags)
git tag v1.4-lw
git show v1.4-lw  # 只有commit信息,没有tag信息
- 补标签
git log --pretty=oneline  # 想为某次commit补上标签
git tag -a v1.2 9fceb02  # 9fceb02 是commit-id
- 分享标签到远程
git push origin v1.5  # push某一个
git push origin --tags  # push全部tags
- 删除标签
# 第一种方法
git tag -d v1.4-lw
git push origin :refs/tags/v1.4-lw

# 第二种方法
git push origin --delete
Git进阶-分支
1、 分支简介
(1)什么是分支?
- 如下图,master是默认分支,testing是其他分支。
- 分支的存在是让你可以把master作为正式环境,把testing作为开发环境,当开发环境的代码需要上线时就将其合并到正式环境master。

(2)默认分支
- master
(3)分支详细说明
2、本地分支操作
(1)创建分支
git branch test
(2)切换到该分支
- 当分支还存在文件没有add+commit的时候,是没法进行分支切换的。
git checkout test
(3)创建并切换分支一步到位
git checkout -b test
(4)查看分支
git branch
(5)合并分支
git merge test  # 在master分支上将test分支合并过来
git merge master  # 在test分支上将master分支合并过来
(6)分支冲突解决
- 当两个分支的同一文件都被修改提交时,这时合并两个分支就会出现冲突,那么解决冲突的办法就是手动修改两个文件,使其一致。
git mergetool # 查看合并冲突
(7)删除分支
git branch -d test # 在master分支上删除test分支
(8)查看被合并过的分支
git branch --merged
(9)查看未被合并过的分支
git branch --no-merged
3、远程分支操作
(1)克隆远程仓库
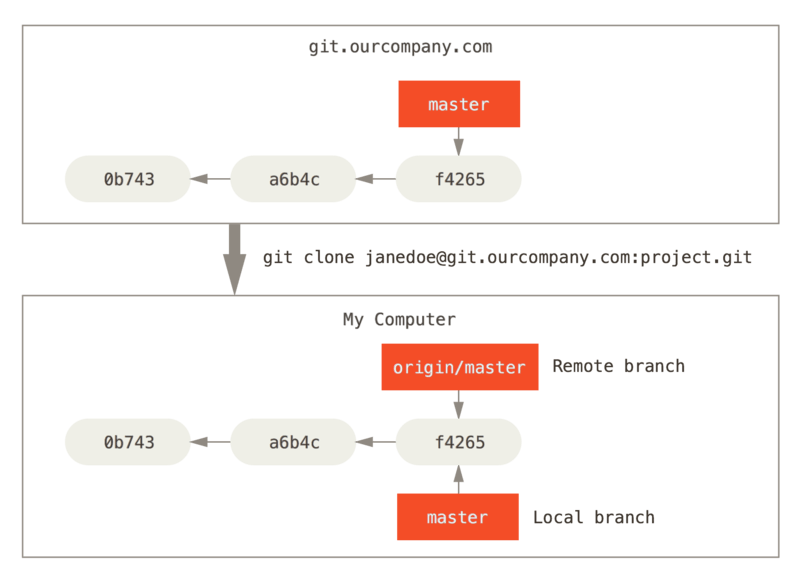
- 图片来源于官网
(2)当远程仓库被修改后
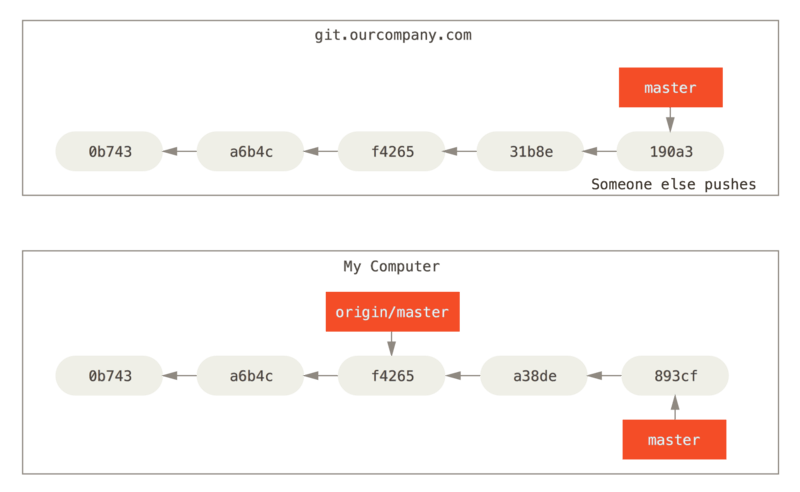
- 图片来源于官网
(3)git fetch origin后的远程仓库和本地仓库
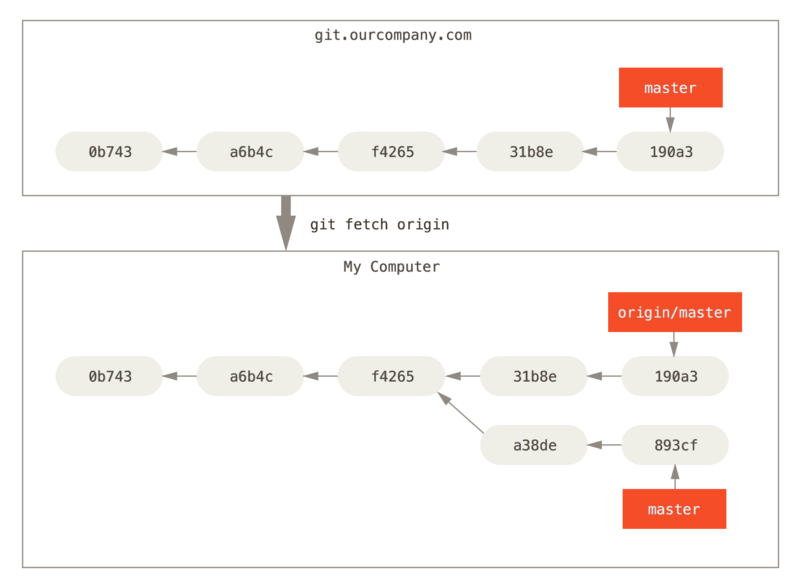
- 图片来源于官网
(4)多个远程仓库
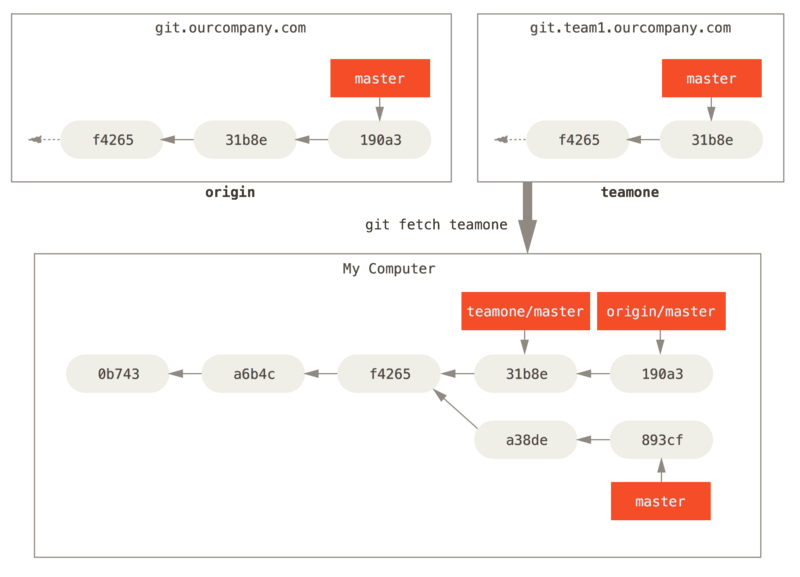
- 图片来源于官网
(5)push分支到远程
- 只推送你想跟别人共享的分支deploy
git push origin deploy
(6)在本地仓库建立一个新分支并与远程仓库对应
git checkout -b serverfix origin/serverfix
git checkout -b sf origin/serverfix
git checkout --track origin/serverfix
(7)查看本地分支跟踪的是哪个远程分支及具体信息
# 如果想查看远程最新信息则先用fetch命令
# git fetch --all
git branch -vv
(8)删除远程分支
git push origin --delete serverfix
注意:Basically all this does is remove the pointer from the server. The Git server will generally keep the data there for a while until a garbage collection runs, so if it was accidentally deleted, it’s often easy to recover.
4、Rebasing
(1)什么是Rebasing?
- In Git, there are two main ways to integrate changes from one branch into another: the
mergeand therebase.
(2)merge

(3)Rebasing
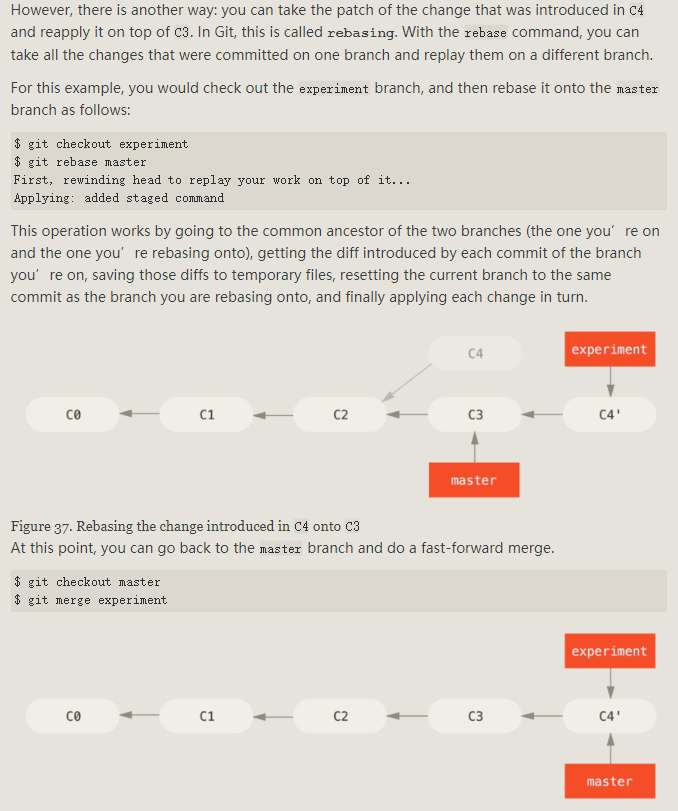
- 如上图,rebasing相当于是把c4这个commit_id抹去,这样会导致这个提交信息被清除,有利也有弊。
注意:
- Do not rebase commits that exist outside your repository and people may have based work on them.
- 即不要rebase别人的提交信息,导致混淆产生。
(4)merge vs rebasing
- 个人还是觉得merge好,但是如果合并历史太多,可以酌情使用rebasing
Git进阶-Git Flow
Git Flow简介
Git Flow是什么?
- 团队合作开发时,主分支、开发分支、功能分支、bug分支等等必不可少。那么问题来了,多人多分支的情况应该如何制定一个工作流程才不产生冲突呢?答案是:
- Git Flow
- GitHub Flow
- GitLab Flow
- Git Flow让我们更方便的管理一个项目
Git Flow安装
For Windows users, Git for Windows is the recommended method.
Git for Windows
Follow the instructions on the Git for Windows homepage to install Git for Windows. As of Git for Windows 2.6.4, GitFlow (AVH edition) is included, so you’re all done.
Git Flow操作
寻求帮助
git flow help # 查看命令帮助
在仓库中设置git-flow
git flow init
注意:
- 把项目切换到git-flow时,就用git-flow命令操作
- 普通的git命令和git-flow命令互不冲突
- git-flow不会改变仓库
- 使用
git flow init命令时,实际上只是在当前分支配置了一些命名规则
分支的模式
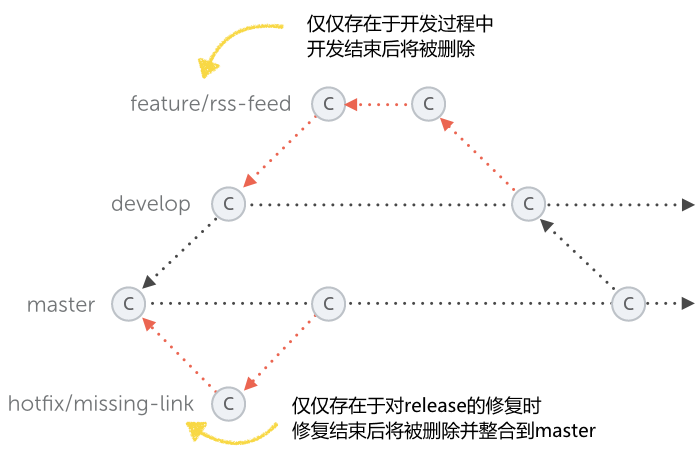
长期分支
git-flow会预设两个主分支在仓库中,也就是说要同时维护两个分支
- master:正式环境代码,不能在这个分支上工作
- develop: 开发分支,以该分支为基础分支来进行功能开发等等
短期分支
短期分支只是临时存在,当开发完成则可以删除该分支
- feature:功能开发分支
- hotfix:bug修复分支
- release:版本发布分支
功能开发分支-feature
feature分支基于develop分支
git flow feature start concat # 新增留言功能
git flow feature start new_feature命令会在develop分支上创建一个new_feature分支,然后就可以在该分支上进行功能开发- 当完成功能开发后,合并与删除分支命令如下
git flow feature finish concat # 完成功能开发
git flow feature finsih concat命令会把concat分支开发的内容整合到develop分支中,并把concat分支删除
版本管理-release
release分支基于develop分支
当develop分支的代码已经成熟时,就可以把这部分工作生成一个要发布的版本,使用如下命令生成版本号以及版本管理
git flow release start 1.1.1 # 版本号1.1.1
- 上述命令产生release分支后,再对该分支的一些文件记录版本号则可以使用以下命令进行版本发布
git flow release finish 1.1.1
git flow release finish 1.1.1命令会做如下操作- 拉取远程仓库,确保本地仓库是最新
- release分支的内容会合并到master和develop分支上
- 删除release分支,并回到develop分支
bug修复-hotfix
创建hotfix
hotfix分支是基于master分支的,对已发布的代码修复bug
git flow hotfix start bug1
完成hotfix分支
git flow hotfix finish bug1
git flow hotfix finish bug1内部操作如下- 完成的改动会合并到master和develop分支上
- 这个hotfix程序将被标记
- hotfix分支被删除,然后回到develop分支
- 然后利用release分支操作发布版本
参考书籍
疑难解答
清除历史提交中的敏感信息
问题介绍
- 某次提交把私人信息(密码或私钥等)提交到了远程仓库,该怎么办?
处理方式
第一种情况
- 提交的敏感信息还没有推送到远程仓库
# 修改代码
git commit --amend
第二种情况
- 提交的敏感信息已经推送到远程仓库
git filter-branch --force --index-filter 'git rm --cached --ignore-unmatch your_want_to_rm_file_name' --prune-empty --tag-name-filter cat -- --all
git add .
git commit -m "rm some files"
git push origin --force --all
2、git commit 提交规范
* 模板如下:
\(\): \
\
\
\
\ 


